Feeds:
Posts
Comments

Archive for February, 2010

Red Heering

So dinner’s on the stove.  While it cooks, you’ve got some nuts and you’ve got some olives to nibble on.  Now, what to wash them down with?

As I’ve noted that it has been noted, the last decade was a good one for cocktails.  No more -tinis, no more froo-froo nonsense, just an honest appreciation for cocktails as culinary creations, as dependent on quality ingredients, balance, proportion and care as anything else that comes out of a kitchen.  Needless to say, the artisanal cocktail movement has gotten out of hand in some respects, but you don’t need to wear arm garters to make a great drink.

One of my favorite pre-dinner quaffs is the Red Hook, a variation on a Manhattan which gets its name from the cherry liqueur (maraschino) that sets it apart from the standard Manhattan.  Unfortunately, when I tried to purchase some Luxardo Maraschino at the only state-run liquor store in town which seems to carry it, the arm-garter crowd had beaten me to the punch and cleared out the entire shelf.  Undeterred, I decided to purchase some Cherry Heering instead.  Cherry Heering is a liqueur which is also popular in cocktails; unlike maraschino, which is clear, Heering is very dark, syrupy and perhaps a little too reminiscent of cherry Robitussin for some people’s taste.  This being Seattle, however, where everybody is crazy for all things Scandinavian (there is actually a Leif Erikson Hall here), I figured getting a bottle of the Danish-made Heering would qualify as what the anthropologists call “going native”.

The Heering adds quite a bit of heft to this cocktail, especially when combined with a bracingly astringent vermouth like Punt e Mes, so I had to scale back the proportions of liqueur and vermouth to keep them in balance with the rye.  To my taste, this cocktail hits the most important note for an aperitif:  It balances sweetness with a pronounced bitterness that stimulates the palate and whets the appetite.

The hour before dinner may have never been a better time to drink.

  • 2 oz. rye whiskey (especially Rittenhouse Rye, if ever they decide to sell it in the state of Washington; until then, Old Overholt will have to do)
  • 1/4 oz. red vermouth, such as Punt e Mes
  • 1/4 oz. Cherry Heering

Mix all of the ingredients.  Pour into a glass with two ice cubes.  Top with club soda if desired.  Serve with something to nibble on.

Read Full Post »

I’ve got a few friends who are struggling mightily against a pernicious and debilitating aversion to olives, an antipathy even more dumbfounding than a hatred of fennel.  As a tribute to these noble souls, I present this recipe for roasting olives, a technique that takes everything awesome about olives and ramps up its awesomeissitude.  Along with spicy candied pecans, these are the perfect cocktail-hour nibble.

  • 8 oz. Castelveltrano or other olives (with pits, please)
  • 1 glug of olive oil
  • 1 clove of garlic
  • 1 3-inch strip of orange peel
  • 1 bay leaf

Preheat the oven to 350 degrees.  Rinse and dry the olives, then toss with all of the other ingredients.  Place in a gratin dish, casserole or other ovensafe dish.

Put in the oven and roast for about 15 minutes.  The olives will be wrinkled and brown in spots.  Discard bay leaf, and serve olives warm with the garlic and orange zest.

Read Full Post »

A great pre-dinner nibble with cocktails, ready in about fifteen minutes.  I would say that they keep for weeks in an airtight container, but I’ve never seen any left over, so I would have no basis for that claim.  These are also great tossed into a salad, especially one with blue cheese.

  • 1 c whole pecans
  • 2 T maple syrup
  • 2 T olive oil
  • 2 t Seasoning Salt or other spice mixture (garam masala and Chinese five-spice powder both seem like they would be great choices)

Preheat the oven to 300 degrees.  Toss all of the ingredients together; add salt and pepper to taste.  (These pecans should have a nice balance of sweet, salty and spicy.  Adjust accordingly.)  Spread the pecans in a single layer on a baking sheet and bake for about 10 minutes.  They should look golden brown, not burnt, and just slightly tacky looking (not too wet).  Let cool for at least 5 minutes (or longer, if you are better at resisting temptation than I am).  Eat by the handful.

Read Full Post »

Amazingly, there are still people out there who don’t like fennel.  In fact, I just saw a web feature by one of my favorite restaurant critics in which he talks about his dislike of fennel.  This is mystifying to me:  Fennel is refreshingly crunchy when raw, luxurious and comforting when cooked, it can be cut in a variety of shapes (wedges, slices, shavings) and prepared in a variety of methods (braised, deep-fried, sliced thin and eaten raw), and it works beautifully in most European and Mediterranean cuisines.

The downside for some people, of course, is that fennel is anise-flavored, which means it tastes somewhat like black licorice, a candy which tends to provoke irrationally strong responses in people.  The best retort that I ever read about this ridiculous fennel-hating ran something along the lines of “avoiding fennel because you dislike black licorice is like avoiding fresh Rainier cherries because you can’t stand Life-Savers.”  In other words, while fennel does draw from the same flavor palette as licorice, it is a completely different animal.  (Er, vegetable.)  Fennel, like fresh cherries, is too good to miss out on.

So, if you hate fennel or you know someone who does, this recipe will help to cure you (or him, or her, or them) of this irrational and destructive phobia.  Of course, if you love the taste of anise as much as I do, you’ll jump at the chance to work fennel into this unusual and delicious pasta.  The recipe is based on one in Mario Batali’s Simple Italian Food, and it’s a great vegan dish that manages to be both filling yet surprisingly refreshing at the same time.

  • 2 fennel bulbs, stalks trimmed off and put in the stock bag, fronds reserved
  • olive oil, as needed
  • 1 clove of garlic, peeled
  • pinch of red pepper flakes
  • 1 lb. penne rigate, rigatoni, maccheroni or other short tubular pasta (ideally with ridges)
  • 1 oz. Sambuca, pastis or other anise-flavored liqueur (optional)
  • 1 c bread crumbs, toasted
  • handful of mint leaves

Using a sharp knife (or better yet, a mandoline), slice the fennel bulb crosswise into 1/8 inch-thick slices.  Heat a couple of glugs of olive oil in a large skillet over medium heat; add the garlic and red pepper.  When the oil is hot, add the fennel slices and a generous pinch of salt.  Saute over medium heat.

Meanwhile, put a pot full of water for the pasta on the stove; turn the heat to high and bring to a boil.  Salt the water and cook the pasta.  Continue sauteing the fennel; it should be nice and brown and caramelized.  About five minutes before the pasta is done, add the liqueur if you are using it.  Stir into the fennel and cook for two minutes.  Add the bread crumbs and a little more olive oil.   Stir well so that they are incorporated with the fennel.  Continue to saute.

When the pasta is done, drain it well and toss it in the skillet with the fennel.  Chop the mint leaves and the reserved fennel fronds; stir into the pasta.  Add salt, pepper and olive oil to taste.  Serve immediately in heated bowls.

Read Full Post »

This recipe was inspired by an article by Mark Bittman, who drew his inspiration in turn from a French restaurant called Zucca Magica.  (In the same way that tacos con hongos sound better than “mushroom tacos”, zucca magica sounds much more mysterious and flamboyant than “magic pumpkin”.)  This dish fits right in with my ongoing efforts to eat more fruit and to create refreshing wintertime salads.  It is nothing more than peeled orange slices with anchovy-less tapenade.  (I thought about calling it ta-pe-NOT, but I don’t think I could look myself in the mirror if I did that.)

One unexpected consequence of using blood oranges in the salad instead of regular oranges:  The purple Kalamata olive-puree was virtually indistinguishable from the red-purple flesh of the oranges.  While still a beautiful salad, it lacked the dramatic contrast of the dark olive puree on bright orange slices.  Perhaps next time I’ll put green olives on blood oranges and black olives on regular oranges?

  • 2 blood oranges or regular oranges (or a combination)
  • 12 Kalamata olives (you could use any olives you want, adjusting the quantity as needed)
  • 1 small garlic clove, peeled
  • pinch dried or fresh thyme
  • olive oil, as needed (about 1/4 c)

Zest one of the oranges; reserve the zest.  Peel and slice the oranges, discarding peel.  Place the orange slices on a serving platter in an overlapping pattern.

Using the flat side of a chef’s knife, squash the olives.  Using your fingers, remove and discard the pits.  Mince the olives finely; set aside.

Smash and chop the garlic clove.  Using a mortar and pestle, pound to a puree.  (If you don’t have a mortar and pestle, use the side of the chef’s knife to puree the garlic.)  Add the orange zest, olives and thyme to the garlic.  (Putting the orange zest in the olive puree really ties the two components of the dish together.)  Pound the garlic-olive mixture until it is a coarse puree.  Stir in enough olive oil to make a loose mixture with the consistency of pesto.  Add freshly ground black pepper to taste (you won’t need to add any salt).

Spoon the mixture over the oranges.  Serve as an appetizer or between-courses salad.  For a great but definitely not vegetarian dish, serve it next to sauteed chicken livers as an appetizer:  The saltiness and acidity of the salad cut the richness of the livers beautifully.  (Also, you may want to make extra olive puree just to have on hand.  It’s great on just about anything.)

Read Full Post »

Falafel

I used to think I hated chickpeas—HATED them.  I thought they were insipid, with a grainy texture that was startlingly unpleasant.  For years, I assiduously avoided anything that contained them.

I’m not sure what made me decide to start cooking my own chickpeas, but it was then that I realized that what I hated so much was not chickpeas per se, but *canned* chickpeas.  The difference between canned chickpeas and dried is like night and day:  Dried chickpeas cook up as rich, meaty, tender, flavorful legumes.  Sometimes I wonder if I can get enough chickpeas:  I just ate them three ways (falafel, hummus, roasted chickpeas) and loved every bite.

In my ongoing series of tributes to the great eating establishments of Washington, DC (and that is not an oxymoron, for all you haters out there), I was inspired to make falafel out of my pining for Amsterdam Falafel Shop.  Why isn’t there a falafel shop next door to me that is open until 3 am, with a huge fix-it-yourself condiments bar featuring very well-roasted cauliflower and a parsley sauce that, paradoxically, contains a higher molarity of garlic than pure garlic itself does?  I’m sure there’s great falafel in Seattle, but I ain’t found it yet, and I won’t bank on it being available every time a falafel craving strikes.  Best, I thought, to make my own.

You should make your own, too.  It is actually ridiculously easy, as easy as making a hamburger.  You do have to plan ahead and soak the chickpeas overnight (which you should do with dried chickpeas, anyway), but you don’t cook the chickpeas before you chop them up and form them into patties.  (This seems very counter-intuitive and unsettling the first time you do it:  Why am I eating raw chickpeas, you think?  Can they possibly cook all the way through and come out tender?  They will, miraculously.  Have faith.)

A couple of pointers:   You don’t want to over-process the chickpeas, or the falafel will be tough.  Just puree them until they’re coarsely ground, somewhere between cornmeal and gravel in size.

Also, patties are easier to form than balls and can be cooked in much less oil; they also feature a higher crispy-surface-to-tender-inside ratio, which I prefer.  Finally, the dough is so fragile that the patties tend to come apart in my hands.  I figured out the technique of mashing the patty onto the end of a slotted spoon, and then sliding the patty off the end of the spoon into the pan.

Amazingly, even if the patty breaks apart a little, I can push the pieces back together in the pan and they will fuse back together as they cook.

  • 2 c dried chickpeas, soaked overnight in water to cover by an inch, then drained
  • 1 small onion, peeled and roughly chopped, or 3 green onions, trimmed and chopped
  • 2 garlic cloves, peeled
  • either 1 t each of coriander and cumin, ground, or 1 t pimentón
  • 1/2 t cayenne pepper
  • olive oil for frying, as needed

Combine the first five ingredients with several pinches of salt and several grinds of fresh ground pepper in a food processor.  Process until coarsely ground; transfer to a bowl.  Preheat oven to warm or lowest setting.

Pour olive oil into a cast-iron skillet to a depth of 1/4 inch and heat over medium heat.  When oil is hot and shimmery, form slider-sized patties with your hands.  (Your hands will get very messy, and the falafel dough feels very gritty and unpleasant.  Just man up and deal with it.)  Mash the patty onto the end of a big spoon, and then carefully slide the patty of the spoon into the skillet.  Repeat; you should be able to fit four patties in a 9-inch cast iron skillet at a time.  Cook for about 3-4 minutes, until bottom forms a nice brown crust.

Flip the patties and cook for 2-3 more minutes.  Transfer to a paper towel-lined ovensafe dish, season with salt and pepper, and keep warm in the oven while you prepare the rest of the falafel.  You should get at least a dozen patties from this recipe.

Serve hot with:

Read Full Post »

The other night, my friends and I were debating whether Seattle (where I currently reside) or Portland, OR was a better city for dining.  This argument struck me as slightly ridiculous, given that both cities are incredible places to eat, with a wealth of dining options of every cuisine and price range.  If Seattle doesn’t have enough food to excite you, I thought, you’ve set the bar at some ridiculously high standard.  The foie gras is always fatter, I figured, at a friend’s favorite restaurants.

This got me thinking about how every city offers its residents something unique that they long for after they move away, even if they have moved to a Mecca of food and dining.  While Seattle leaves very little to be desired in the food department, I do find myself, an East Coast expatriate, dreaming about Philly cheesesteaks more often than befits a grown man.  And while Washington, DC would never satisfy any Pacific Northwester’s desires for artisanal coffeeshops and craft breweries that specialize in Pine-Sol flavored beers, it does have the restaurants of José Andrés.

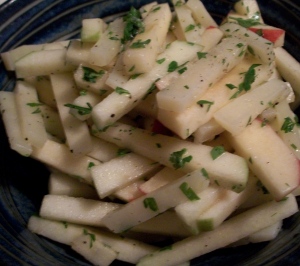
If you’ve ever eaten in the DC area or are in any way in touch with the gastronomic zeitgeist, you know that José Andrés is one of America’s biggest celebrity chefs, a Spaniard who has spread the gospel of tapas, meze and small plates of every stripe.  His Mexican restaurant, Oyamel, is the inspiration behind these tacos; the quality of his Mediterranean restuarant, Zaytinya, has been amply attested to by my friend.  However, it is his flagship restaurant, Jaleo, that attains that rare distinction of being both insanely popular and also deserving of every bit of its popularity.  It’s a restaurant I could eat at every day and never tire of, and it’s changed the way I conceive of cooking.  This recipe is a great example:  Everybody loves apples and cheese, but with a very simple technique and a little olive oil, these ingredients can be transformed into a great wintertime salad that is unexpected, innovative and yet very comforting.

  • 1 Granny Smith apple
  • 1 red apple, such as Braeburn or Gala
  • 3 oz. Manchego cheese (a mild white cheddar can be substituted)
  • handful of chives or parsley
  • olive oil, as needed (It goes without saying that by “olive oil” I mean “extra virgin olive oil”, and in this case I mean the best that you can get.)
  • flaky sea salt, preferably Maldon, as needed

The novelty of this salad is that the apples and cheese are cut into pieces of identical size, so it is only the green and red tips of the apple that distinguish it visually from the cheese.  It makes for a striking presentation, and it is simple to do, even if your knife skills (and your knives) are as dull as mine.

Cut the top and bottom off the Granny Smith apple; discard the top and bottom.  Cut one side off, then rotate 90 degrees and cut the next side off; repeat two times to “square” the apple.  Discard the sides.  (They’re perfectly good eating, so save them for a snack with peanut butter and honey.)  Cut a 1/4 inch thick slice off one side.

You should be able to make a second slice before you hit the core.  Rotate the apple 180 degrees and make two slices off the next side.  Rotate the apple 90 degrees and make two slices off the (now narrow) side; rotate 180 degrees and repeat on the last side.

You should now have four wide blocks of apple and four narrow blocks.  Stack the blocks of similar size on top of each other; cut the apple blocks into 1/4 inch-wide batons (as per the picture at the top of this post) and toss into a mixing bowl.

Repeat this entire process with the red apple.  (I like to use apples of different colors for the visual effect; in addition, the tartness of the Granny Smith makes the overall dish more complex than it would be with just sweet apples.  I also like to cut the Granny Smith first: I think its acidity causes it to brown at a slower rate once it’s cut than the sweeter apples, so the finished dish maintains a nice, fresh appearance.)

Cut the cheese into 1/4 inch-thick slices.  Stack, and cut into 1/4 inch-thick batons.

Add to the apples.  Mince the herbs finely and add to the apple-cheese mixture.  Add a decent glug of olive oil, a generous sprinkling of flaky sea salt and a few grinds of black pepper.  Toss everything well to combine.

Serve in the hippest dish you can find and enjoy.

Read Full Post »

Don’t tacos con hongos sound much better than mushroom tacos?  In fact, the word “mushrooms” is rather unappetizing, which is unfortunate, because they make a singularly delicious and invaluable contribution to vegetarian cuisine:  Their firm texture and hearty, meaty flavor make them appropriate for entrees, appetizers and side dishes in a variety of cuisines.  Perhaps this is why the different varieties of mushrooms often have romantic and exotic-sounding names:  portobello, cremini, chanterelle, hen-o’-the-woods.  Even “button” mushrooms sound cute and much more enticing than “plain, boring ol’ white” mushrooms.

Here, then, is a recipe for a taco filling that even Militant Carnivores will find satiating and satisfying, call it what they will.  With a few modifications (e.g., replacing the dried chile with sage leaves), this makes an excellent ragù for pasta or bruschetta; it is also a great filling for cannelloni.  Adding some cooked quinoa really gives the dish some body and a texture reminiscent of ground beef for those who fondly remember childhood tacos made with hamburger.

  • 1 lb. cremini or button mushrooms, washed and trimmed (save any tough stems for veggie stock!)
  • 1 garlic clove, peeled
  • olive oil, as needed
  • 1 dried large chile, such as ancho or guajillo, stem and seeds removed
  • 1/2 c heavy cream
  • 1/2 c cooked quinoa
  • 12 corn tortillas (taco-sized)

Garnishes:

  • sliced radishes
  • cilantro leaves
  • grated cotija or crumbled queso fresco
  • chopped green onions

Halve the mushrooms; if there are any particularly large ones, quarter them.  Smash the garlic clove and place it in a large skillet with a few glugs of olive oil over medium heat.  When the garlic starts to dance, add all of the mushrooms, the dried chile and a few good pinches of salt; turn the heat to medium-high.  With tongs, try to turn as many of the mushrooms as you can so that the cut side is flat on the skillet.  After a few minutes, toss or stir the mushrooms around.  (At this point, you have sauteed mushrooms, which are certainly good enough to eat by themselves.  To gild the lily, however, read on.)

Add the cream and several grinds of black pepper to the skillet.  Heat for several minutes, stirring occasionally.

Meanwhile, heat a cast-iron skillet over medium heat.  Cook the tortillas on the skillet, about 15 seconds per side, just to warm through.  The cream should start to reduce and thicken.  When it looks like this…

… stir in the quinoa.  Remove and discard the dried chile (or, if you’re really ambitious, toss the chile in a blender with a little water, puree and then strain through a sieve into a bowl, and then add to the mushroom mixture).  Check the seasoning.  Put two or three tortillas on each plate, then spoon the mushroom mixture on top.  Serve with the garnishes.

Enjoy!

Read Full Post »

An unexpected gift

I received a package from a former student yesterday with this apron inside:

Pro dono iucundissimo lepidissimoque maximas gratias discipulae meae ago!

Read Full Post »

One of the rituals of being a twentysomething in America today (and, so it seems, of being a thirtysomething) is the act of giving away 95% of your kitchen goods the day before you move.  Sure, when you set up your new place, you’d like to have a few basics (e.g., salt and pepper) on hand so you don’t have to rush to the store right away.  But do you really want to move those annatto seeds halfway across the country?  Is there even room on the Uhaul for that barely used bottle of nuoc mam?  And how long has that jar of ground ginger been in the pantry, anyway?

As we reap, so shall we sow.  A few months ago I had the privilege of pawning off a few beer cases worth of pantry staples on my unwitting but very gracious friends, and now the favor has been returned:  A friend of my Lovely Vegetarian Wife recently gave us several wine crates worth of capers, pickles, salad dressing and other assorted groceries.  This was a challenge that the Militant Carnivore gladly accepted:  What to do with several grab bags of food?

If anybody ever gives you four bags of frozen cranberries, do this.  It is loosely based on a recipe from Smitten Kitchen, although it doesn’t begin with making caramel.  What a pain that would be to make caramel, I thought to myself.  It could splatter or it could burn.  Much easier, I figured, just to mix the cranberries and sugar together and cook.

Let this be a warning to us all:  If you are cooking something on the stove while doing other things, make sure that the burner is on low.  Not high.

Definitely not high.

The syrup is still fantastic, and perhaps all the better for the smoky burnt-caramel undertone that it has.  But two weeks later, I’m still scrubbing the damn pot.

  • 4 cups frozen cranberries
  • 3 cups sugar
  • 4 cups of water

Put everything in a big pot.  Simmer over *low* heat until the mixture is syrupy, about 30 minutes.  Strain, discarding the solids; keep the syrup in the fridge.

N.B.  This makes a lot of syrup; if you are not trying to use up somebody else’s cranberries, you may want to halve or even quarter this recipe.  Also, the syrup can set up in the fridge due to all of the pectin in the cranberries; you can either use it as cranberry jelly, or microwave for about twenty seconds to liquefy it.  Serve over ice cream, crepes or old shoes.

Read Full Post »

Older Posts »